Configuration 2
- Jonas Hallensleben
- Remie Bolte
There are two types of settings you have to configure when you start using Version & Component Sync (VCS).
There are settings to configure when enabling the add-on and there are settings to configure when you create a project link.
- Settings when enabling the add on are explained in step 1
This step can only be executed by the JIRA System Administrator within your organisation - Settings when creating a project link are explained in step 2
This step can be executed by anyone with Project Administrator permission
Step 1: Enable Version & Component Sync
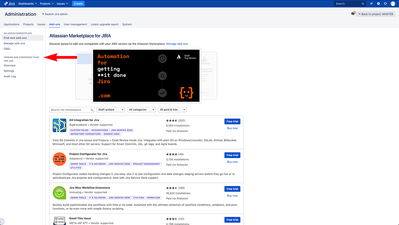
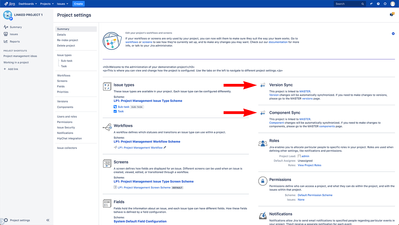
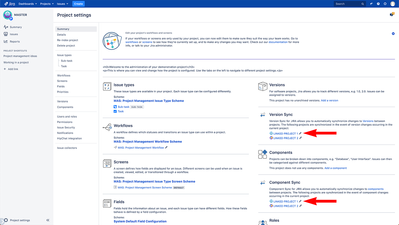
To enable VCS, go to the JIRA administration at the top right of your screen and click on add-ons.
Screenshots 1 & 2
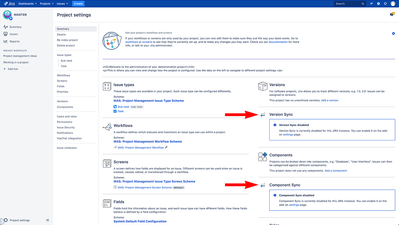
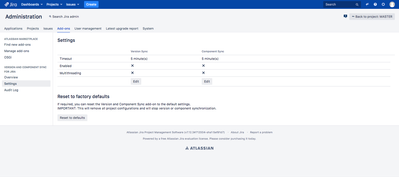
The VCS add-on is shown left on the add-ons page. Click on settings to go to the add-on settings page- When you are on the settings page, you can choose to enable Version Sync and/or Component Sync by clicking on the corresponding edit button
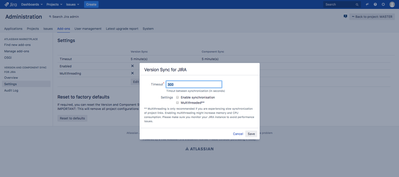
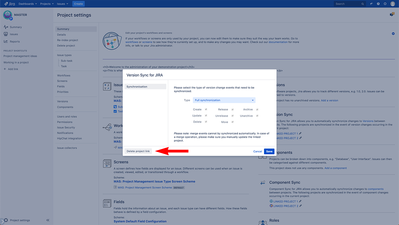
Screenshot 3 - A dialog will show with three options:
Screenshot 4
- Timeout: This setting determines the time in seconds between synchronisations.
- Enable synchronisation: This setting is used to turn synchronisation on and off.
- Multithreaded: When enabled, multiple project links will be synchronised simultaneously. Multithreading is only recommended if you are experiencing slow synchronisation of project links. Enabling multithreading might increase memory and CPU consumption as well as database connectivity. Please make sure you monitor your Jira and database instance to avoid performance issues.
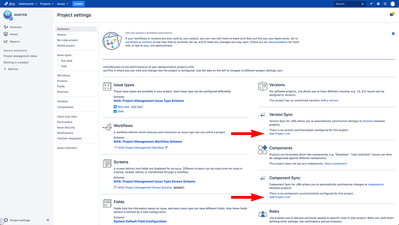
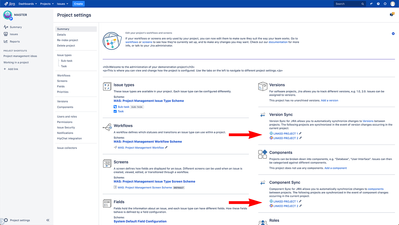
- When you have enabled Version Sync and/or Component Sync, the corresponding panels on the Project administration summary page will show "add project link".
Screenshot 5.
Tip
- When you add a project link VCS starts synchronising versions and/or components immediately.
- To make sure you fully understand the impact that VCS has on your projects, we advise you to first test our add-on in a staging environment prior to configuring links in a production environment. In order to test our add-on, create two or more dummy projects in Jira and link them using VSC
Screenshot 1:
Settings administration summary page
Screenshot 2:
Settings administration add-ons page
 Screenshot 3:
Settings page
Screenshot 4:
Settings Version Sync
Screenshot 5:
Version & Component Sync panels on administration summary page
After configuring the add-on settings, the second step is to create a project link.
Note
Although the example below is focussed on synchronising Versions, the process works the same if you wish to synchronise components.
Versions are propagated from one Master project to multiple Linked projects.
Given we have a Jira instance with a Master project (MAS), a Linked project 1 (LP1) and Linked project 2 (LP2), if we want to share versions from the MAS project, we will need to create project links to LP1 and LP2.
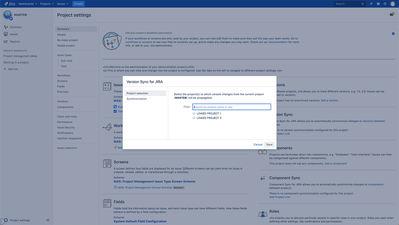
- Go to the Administration interface of the Master project.
You will see a Version Sync panel on the summary page below the Versions panel - Click on the Add Project Link button to open the project link lightbox.
Screenshot 1 Select the project(s) you want to link to the Master project
Versions from Master will be propagated to selected project(s)
Screenshot 2Note
Make sure that you have Project Administrator permission (not just Jira System Administrator) for all projects you would like to make a project link with. If you do not have Project Administrator permission for a project, this project will not be shown as an option to make a project link with.
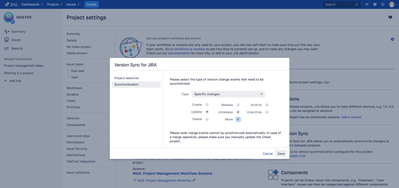
- Click on Synchronisation to select the type of synchronisation
You can choose between Full Synchronisation or Specific Changes.
Screenshot 3 & 4 - Click on the Add Project Link button
- When you added a project link, the Version Sync panel on the administration interface in the Master project will show which projects are linked with the Master project
Screenshot 5 - The Version Sync panel on the administration interface of the linked projects will only show a link to the Master project.
Screenshot 6 - If you would like to make changes to the synchronisation settings, or remove a project link between projects, this can only be done from the Version Sync panel on the project administration interface of the Master project. Removing a project link will stop the propagation of versions/components to the previously Linked project. It will not remove any previously shared versions/components from the linked project. This can be considerate a safe operation.
Screenshot 7 & 8
Screenshot 1:
Add project link
Screenshot 2:
Choose project links
 Screenshot 3:
Full synchronisation
 Screenshot 4:
Specific changes
Screenshot 5:
Version Sync panel master project
Screenshot 6:
Version Sync panel linked project
Screenshot 7:
Project link settings
Screenshot 8:
Deleting project link
Understanding Project Links
There are a few considerations when creating a project link:
- It is effective immediately, meaning that it will start synchronising versions/components as soon as the project link is created
In case of full synchronisation, the add-on will delete any versions/components in the Linked project that do not exist in the Master project - You can create multiple project links for one Master project (e.g. MAS can have project links to LP1 and LP2)
It is not possible to have project links to a project that is already linked or acts as a Master project. For instance, if we have a link between MAS and LP1 we cannot create a project link to MAS or LP1 with LP2 as the Master project - In case of Full Synchronisation, the Versions/Components panel will be removed from the Linked projects administration interface. In addition, the create and edit features of the Versions/Components configuration screen, will be disabled. Linked versions/components will be marked with the Version & Component Sync icon, indicating that these versions/components can only be changed from the Master project
Synchronisation Types
When creating a project link, you can choose between Full Synchronisation or synchronisation based on Specific Changes.
- Full Synchronisation will propagate any and all version/components changes from the Master project to all Linked projects. It will disable the ability to create or edit versions/components from the Linked project administration screen
- Specific Changes will give you more control over the synchronisation of versions/components in the Linked project. You can still manage versions/components from the Linked project administration screen. This is particularly useful if the project has a mixture of shared versions/components and project specific versions/components.
Note
Version & Component Sync will apply changes to versions/components retroactively upon creating the project link for both synchronisation types